Random projects by an average 'have-a-go-Sally', hoping to inspire you to get creative too, be it in the kitchen, in your craft room or just on that tiny space you found on the living room coffee table. Look out for regular posts; Monday Makes (crafty projects), Tempting Tuesdays (baking experiments), Wreck it Wednesdays (Wreck This Journal fun), #tbt (sharing old craft projects), Sticky Saturdays (messy play and crafty projects with children) and #SensorySunday (sensory play with baby Zander).
Sunday, October 30, 2016
Friday, October 28, 2016
Friday Inspiration: Tie Necklace
If you like what you see, share it using one of the magic buttons below.
Leave a comment or even subscribe, it would make my day :)
Thursday, October 27, 2016
#tbt: Wedding Cake
Throw back Thursday: taking a look at stuff I've made in the past.
I have finally found (by accident, after months of searching) the file hiding photos of all the cakes I've made in the past. So, inevitably the next few months will be dedicated to them.
I'll start with our wedding cake.
I remember the last few days before the wedding were specifically for making and decorating cupcakes, everything else had to be done by then so I had time.
In the hoo haa of the day, we completely forgot to cut the top cake, so no one got any of it, which turned out to be unfortunate (for our beloved guests) because when we did finally crack into it, it turned out to be the most deliciously moist, chocolatey cake ever. Ah, shame.
If you like what you see, share it using one of the magic buttons below.
Leave a comment or even subscribe, it would make my day :)
Wednesday, October 26, 2016
Wreck it Wednesday: Compost This Page
Wreck it Wednesday: a page from one of
my journals.
This was fun trying to stick back together!
This was fun trying to stick back together!
I buried the sections in a pot of soil and left it on my window sill for weekly increments.
I didn't enjoy this one as much because my crazy side kept insisting I cleaned the mud off before I put it back into the book...
I don't know what I'll do with the other side yet. We'll have to see.
About 'Wreck This Journal' by Keri Smith
(Description from Amazon)
It is book for those who've always wanted to draw outside the lines but were afraid to do it. For anyone who's ever wished to, but had trouble starting, keeping, or finishing a journal or sketchbook comes Wreck This Journal, an illustrated book featuring a subversive collection of suggestions, asking readers to muster up their best mistake - and mess-making abilities to fill the pages of the book (and destroy them).
Through a series of creatively and quirkily illustrated prompts, acclaimed artist Keri Smith encourages journalers to engage in "destructive" acts - poking holes through pages, adding photos and defacing them, painting with coffee, colouring outside the lines, and more - in order to experience the true creative process. With Keri Smith's unique sensibility, readers are introduced to a new way of art and journal making, discovering novel ways to escape the fear of the blank page and fully engage in the creative process.
Tuesday, October 25, 2016
Tempting Tuesday: Baby Quiche
Zander approved: 4 stars (tasty, smushable in intrigued fingers, I can do it myself but still not as good as fromage frais).
Perfect for little hands, and yummy for Mummy's in a rush.
If you want to make them for people old enough to have a little salt, they are nicer with (as most things are), but for small people under two, they can be salt free.
You'll need a muffin tray.
Ingredients:
4 slices of bread with the crusts cut off
3 eggs
3 tbsp milk
heaped tbsp frozen peas
heaped tbsp grated cheese
a few broccoli florets, finely chopped
Beat the eggs and milk in a large shallow bowl.
You'll need a muffin tray.
Ingredients:
4 slices of bread with the crusts cut off
3 eggs
3 tbsp milk
heaped tbsp frozen peas
heaped tbsp grated cheese
a few broccoli florets, finely chopped
Beat the eggs and milk in a large shallow bowl.
Because I wanted squares and my bread is rectangular, I cut them up so that 4 slices would go into 6 moulds, as you can see in the photo above. The fact that the bread isn't one whole piece for two of the muffin moulds won't make a different once it's cooked.
Dip the bread in the egg, coating both sides, then place each slice in the tray.
Don't worry about leftover egg, we'll use it in a second.
Dip the bread in the egg, coating both sides, then place each slice in the tray.
Don't worry about leftover egg, we'll use it in a second.
Mix your veggies up with the cheese and left over egg.
Divide it all up carefully into each portion.
Bake them in a preheated oven at 180°C for about 15 minutes, until they are cooked through.
I tend to store them in a tuppaware box in the fridge, where they get eaten in a few days.
I love that you don't have to go with peas and broccoli, you can chose anything; meat/veg or just whatever you have in the fridge, which stops small people getting bored and provides ample opportunity for trying lots of new foods.
 | |
|
If you like what you see, share it using one of the magic buttons below.
Leave a comment or even subscribe, it would make my day :)
Sunday, October 23, 2016
Friday, October 21, 2016
Friday Inspiration: Starbucks Marshmallow Cupcakes
If you like what you see, share it using one of the magic buttons below.
Leave a comment or even subscribe, it would make my day :)
Thursday, October 20, 2016
#tbt: Jar Full of Happiness
Throw back Thursday: taking a look at stuff I've made in the past.
I have no idea why I made this, the date on the file is Summer 2015, which to be honest was a rather challenging one, so I'm presuming it was a 'fight back' project. It's freakin adorable though, and I should have printed it off and stuck it on every wall in the house :)
If you like what you see, share it using one of the magic buttons below.
Leave a comment or even subscribe, it would make my day :)
Wednesday, October 19, 2016
Wreck it Wednesday: Press Leaves and Other Found Things
Wreck it Wednesday: a page from one of
my journals.
Just beautiful.
Just beautiful.
About 'Wreck This Journal' by Keri Smith
(Description from Amazon)
It is book for those who've always wanted to draw outside the lines but were afraid to do it. For anyone who's ever wished to, but had trouble starting, keeping, or finishing a journal or sketchbook comes Wreck This Journal, an illustrated book featuring a subversive collection of suggestions, asking readers to muster up their best mistake - and mess-making abilities to fill the pages of the book (and destroy them).
Through a series of creatively and quirkily illustrated prompts, acclaimed artist Keri Smith encourages journalers to engage in "destructive" acts - poking holes through pages, adding photos and defacing them, painting with coffee, colouring outside the lines, and more - in order to experience the true creative process. With Keri Smith's unique sensibility, readers are introduced to a new way of art and journal making, discovering novel ways to escape the fear of the blank page and fully engage in the creative process.
Tuesday, October 18, 2016
Tempting Tuesday: Caramelised Apples with Cinnamon Rice
Tempting Tuesday: trying not to kill my family with my experimental cooking.
I am 90% certain I cocked this up.
For a start, when I came to make it I found I didn't have any cinnamon so I thought I'd use nutmeg instead, which would have been fine had I not used far too much.
Then, I must've not had the stove hot enough as it took so long to reduce the rice, the orange peel had disintigrated and I had to try and fish out the little leftovers.
When I came to cook the apples I decided to use the last bramley up and I misread 1 tsp as 1 tbsp and ended up with very soggy apples. Though edible, I could tell which apple wedge belonged to the bramley and which did not, despite the overpowering nutmeg.
Ingredients:
rice:
100g arborio or pudding rice
850ml milk
75g sugar
1 tsp vanilla ess
1/2 tsp cinnamon
1 strip of orange peel
apples;
25g butter
2 eating apples, peeled, cored and chopped into wedges
1 heaped tsp brown sugar
Put rice, milk, sugar, vanilla, cinnamon and orange peel in a pan and bring to the boil.
Lower the heat and simmer for twenty to thirty minutes until soft and thick. Keep stirring regularly so the rice doesn't stick to the bottom, especially as it gets really thick.
Remove the orange peel and set aside for fifteen minutes.
Melt butter in a frying pan and add the apple wedges.
Sprinkle over the brown sugar and cook on a low heat until the apples are soft and delightfully caramelised.
Serve over the rice.
This is delicious both hot and cold, but personally I prefer it on the warmer side.
Let me know what you think.
 | |
|
Leave a comment or even subscribe, it would make my day :)
Monday, October 17, 2016
Monday Make: Framed Baby Handprint Keepsake
Monday Make: This week's project
When Ed and Bean were six months old, I made little hand casts and they've been sitting on my bedroom window sill ever since. though not without incident unfortunately. The glass on Bean's got smashed and quite recently, a certain wild thing decided to draw all over his cast. I tried to wipe it off, being only pencil, but the more I wiped, the more of the clay came away, removing precious finger prints so I stopped wiping.
I couldn't find a third frame the same, so I knew a plan B would have to be implemented. Luckily, while visiting my Mum's house one day, I spotted a triple picture frame with smashed glass heading for the bin. Obviously I salvaged it.
Once I'd finally dragged us to hobbycraft and bought some air drying clay, convinced Zander to make his handprint and left it for a few days to dry, I prized the older boys handprints out of their original frames, and super glued them onto this one with Zander's addition.
To solve the drawn on handprint issue and the fact that they were all different colours, I decided to give them all a skin tone coat of paint.
Then I printed off the name labels and glued the on too.
Et voila!
Really pleased :)
If you like what you see, share it using one of the magic buttons below.
Leave a comment or even subscribe, it would make my day :)
Sunday, October 16, 2016
Saturday, October 15, 2016
Sticky Saturday: String Printing
Sticky Saturday: messy play fun with kids
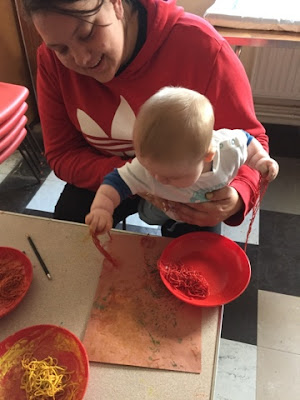
Messy play at our little tots group hasn't been very messy lately as I've had my hands full with Zander but this week I enlisted extra help, so out came the paints!
Very simply, I cut up some string, shoved it in some paint (I went for an autumnal theme) and gave the kids some paper.
This is what we got;
Even Zander had a go, which was a bit of a risk since he'd had spaghetti for dinner the night before...
 |
| Zander & Sophie, the kind friend went on Zander duty so I could get messy. |
If you like what you see, share it using one of the magic buttons below.
Leave a comment or even subscribe, it would make my day :)
Friday, October 14, 2016
Friday Inspiration: Pebbles
If you like what you see, share it using one of the magic buttons below.
Leave a comment or even subscribe, it would make my day :)
Thursday, October 13, 2016
#tbt: Matilda Cushions
Throw back Thursday: taking a look at stuff I've made in the past.
I made these for a friend of mine. She had found the perfect fabric for her Matilda obsessed niece and the cushions perfectly sized for her bed but she needed someone to do the rest.
I particularly love the oxford edges, that extra bit of fabric gives them a lovely finish.

I particularly love the oxford edges, that extra bit of fabric gives them a lovely finish.

If you like what you see, share it using one of the magic buttons below.
Leave a comment or even subscribe, it would make my day :)
Wednesday, October 12, 2016
Wreck it Wednesday: Colour This Entire Page
Wreck it Wednesday: a page from one of
my journals.
I had hoped to make 'firework' pictures with this page but the crayon didn't entirely cover the colour or scrape off effectively. I should've used black paint and I would've tried again on the other page but I didn't want to cover up the 'help' I got from a three year old friend.
I had hoped to make 'firework' pictures with this page but the crayon didn't entirely cover the colour or scrape off effectively. I should've used black paint and I would've tried again on the other page but I didn't want to cover up the 'help' I got from a three year old friend.
About 'Wreck This Journal' by Keri Smith
(Description from Amazon)
It is book for those who've always wanted to draw outside the lines but were afraid to do it. For anyone who's ever wished to, but had trouble starting, keeping, or finishing a journal or sketchbook comes Wreck This Journal, an illustrated book featuring a subversive collection of suggestions, asking readers to muster up their best mistake - and mess-making abilities to fill the pages of the book (and destroy them).
Through a series of creatively and quirkily illustrated prompts, acclaimed artist Keri Smith encourages journalers to engage in "destructive" acts - poking holes through pages, adding photos and defacing them, painting with coffee, colouring outside the lines, and more - in order to experience the true creative process. With Keri Smith's unique sensibility, readers are introduced to a new way of art and journal making, discovering novel ways to escape the fear of the blank page and fully engage in the creative process.
Tuesday, October 11, 2016
Tempting Tuesday: Baby Banana Fingers
Tempting Tuesday: trying not to kill my family with my experimental cooking.

I made these for Bean and Ed when they were tiny, so obviously Zander gets them too. They're so easy to make and they're brilliant for babies who are just getting the hang of this whole eating thing. They're also junk free, with no sugar unless you decide you want them sweeter.
Ingredients:
2x bananas, preferably ripe.
a mug full of self raising flour,
a mug full of instant oats (or smashed up* porridge oats)
100g butter or 3tbsp oil
1 tsp vanilla essence.
Please excuse my three bananas, as I got so many of them in my 9 pence bag, I thought I'd make a giant batch and see if half of them survive going in the freezer.
Smush up all the ingredients together.
Make them into baby fist size fingers (yes, I know they look like poos), and bake in the oven for about 15 minutes (or until golden) at 180°C (fan oven)
*smash up porridge oats using a food processer
***************UPDATE***************
It took a few attempts, but Zander really seems to like them (although he's in his throwing stuff stage).
And the best news ever...they survive the freezer!! Once defrosted at room temperature, you'd never guess they'd been frozen. Yay!
Time to make a giant batch.
 |
| Free printable recipe card. Just right click & save as. |
If you like what you see, share it using one of the magic buttons below.
Leave a comment or even subscribe, it would make my day :)
Subscribe to:
Comments (Atom)


