Showing posts with label printable. Show all posts

Tuesday, January 10, 2017

Tempting Tuesday: Chocolate & Marshmallow Ice Cream

Tempting Tuesday: trying not to kill my family with my experimental cooking.


Warning: this recipe contains raw egg.
Useful info: you do not need an ice cream maker.

My favourite ice cream in the world ever is of course Ben & Jerry's Phish Food, so, after the toffee ice cream success (as in; we didn't die) I thought I'd make my own.

Makes enough to fill a 1 litre tub.

Ingredients:
3 eggs, separated,
75g icing sugar
300ml double cream
1/2 tsp vanilla essence
2 tbsp marshmallow fluff
2 tbsp nutella
chocolate buttons
toffee ice cream sauce

Method:
Whisk the egg whites until stiff.
Add icing sugar a bit at a time, whisking until stiff each time.
In another bowl, whip the double cream until it holds it's shape, but is still a bit floppy.
In a cup, lightly beat the egg yolks with the vanilla.
Add them to the cream along with half of the whites and gently fold it all together.
Being even gentler, fold in the rest of the whites then, just before you transfer it to a plastic tub, slowly swirl in the rest of the ingredients, saving the toffee sauce to squidge all over the top.
Chill overnight, or at least 6 hours.

Can't even tell you how yummy this is...
Free printable recipe card. Just right click & save as.

If you like what you see, share it using one of the magic buttons below. 
Leave a comment or even subscribe, it would make my day :)

Tuesday, January 3, 2017

Tempting Tuesday: Banana Cake

Tempting Tuesday: trying not to kill my family with my experimental cooking.


This recipe is incredibly easy and marvellous when you've got some bananas going brown in the fruit bowl, especially as you can be pretty certain you've already got the other ingredients in the cupboard. It's lighter than I expected and so fluffy. I bet it would be yummy with custard too (it was all gone before I had a chance to try).

Ingredients:
3 small bananas
1 tsp lemon juice
100g butter
100g sugar
2 eggs
225g self raising flour


 Method:
Preheat oven to 200°C.
Mash bananas with lemon juice.
Blend butter and sugar.
Add eggs, then bananas.
Sift in flour and mix well.
Turn into a greased tin and bake for about 40 minutes.

Free printable recipe card. Just right click & save as.

If you like what you see, share it using one of the magic buttons below. 
Leave a comment or even subscribe, it would make my day :)

Tuesday, November 29, 2016

Tempting Tuesday: Pear & Cardamom Tart

Tempting Tuesday: trying not to kill my family with my experimental cooking.


My love for a good frangipane inspired this recipe. Think I just love ground almonds, and therefore bake with them as much as possible.

Ingredients:
Pastry case
15 cardamom pods
100g butter
100g caster sugar
Zest of 1 lemon
Juice of ½ lemon
3 eggs
100g ground almonds
35g flour
2 small pears


 Method:
Preheat oven to 180°C (170°C fan).
Crush cardamom pods with a pestle and mortar.
Remove the shells and grind down the seeds. Warning, this is painstaking.
Blend butter, sugar, lemon zest & cardamom seeds together. Add eggs, one at a time, then flour and ground almonds.
Pour the mixture into the pastry case. I made my own (I admit, I'm a bit of snob and have yet to buy a pre-made pastry case, but I kind of suck at making it still).
Peel and core both pears, slicing them into quarters. Score the tops, length-ways to make stripes.
Put pears into a small bowl with lemon juice and mix up so they are all covered in juice.
Arrange the pear pieces around the top of the tart. The original recipe had way more pears, but I couldn't squeeze them all on. It also had three pears which were to be left uncored, with the stalks still on (basically for show) which I was having none of. Can you imagine biting into that? Or at least having to faff with your pudding. No. Just no.
Bake for about 30 minutes, until the middle is almost firm.


Free printable recipe card. Just right click & save as.

If you like what you see, share it using one of the magic buttons below. 
Leave a comment or even subscribe, it would make my day :)

Tuesday, November 22, 2016

Tempting Tuesday: Orange Butterfly Cakes

Tempting Tuesday: trying not to kill my family with my experimental cooking.

I think I found this recipe in an Asda magazine one Easter. Never tried it until now.
As it stands, it only makes enough for 8 nicely sized cupcakes, which is not enough for my house. I'll be doubling everything next time.

Ingredients:
125g butter
125g sugar
2 eggs
Zest of 1 orange
125g self raising flour
1 tsp baking powder
Curd filling:
Zest & juice of 1 orange
40g sugar
2 eggs
50g butter

 Method:
Heat all curd filling ingredients together in a pan very gently and stir until thick. Just like with lemon curd, do not stop stirring.
Leave to cool.
Preheat oven to 180°C (160°C  fan).
Blend butter, sugar, eggs and zest together.
Then sift in flour and baking powder and mix well.
Bake in cupcake cases for about 20 minutes.
Once cool, cut out the tops, add curd filling and gently place the ‘butterfly’ tops on.

I totally baked mine too hot. The tops burnt before the insides were done. And the curd filling recipe originally had the juice of half a lemon, leaving it super runny, which meant that it didn't sit nicely on the tops.

Also, I decorated mine with candied orange peel, but if you want to do that, for goodness sake just freakin' buy some. I've spent days on a whole batch of the stuff and it's still rather inedible. No idea why.
Free printable recipe card. Just right click & save as.

If you like what you see, share it using one of the magic buttons below. 
Leave a comment or even subscribe, it would make my day :)

Tuesday, November 15, 2016

Tempting Tuesday: Lemon Curd

Tempting Tuesday: trying not to kill my family with my experimental cooking.


This one took a few attempts. Mostly because I'm really good at getting distracted and if there's one thing you don't want to do when making lemon curd, it's get distracted.
This is what happens...
It was a bit of a catalogue of errors. I hadn't stirred it enough, so the egg white cooked first which left it with some delightful white lumps. I tried to whisk them out (unsuccessfully), but then it was almost a mousse, so I popped it back to the stove, but then forgot about it and ended up with that black mess.

Never mind. Attempt two, with some lessons learnt, was much more successful.

This makes enough for almost two jars. Have them sterilised and ready.
Ingredients:
zest of 1 lemon
juice of 2 lemons
2 eggs, lightly beaten
50g butter
175g castor sugar

Method:
Put all the ingredients in a heavy bottomed pan and heat very gently on the stove, stirring the whole time. A silicone whisk is great for this. 
In twenty minutes it should be lovely and thick. 
Pour the hot stuff carefully into the jars and put the lids on. 
When they're cool, store them in the fridge.

Free printable recipe card. Just right click & save as.

If you like what you see, share it using one of the magic buttons below. 
Leave a comment or even subscribe, it would make my day :)


Tuesday, November 8, 2016

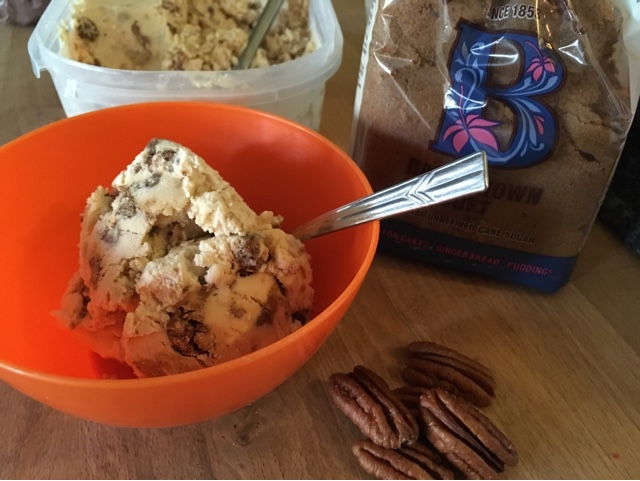
Tempting Tuesday: Toffee & Nut Ice Cream

Tempting Tuesday: trying not to kill my family with my experimental cooking.

Warning: this recipe contains raw egg.
Useful info: you do not need an ice cream maker.

Being a huge ice cream fan, it's genuinely shocking I haven't tried to make my own yet, but then I don't have an ice cream maker. Thankfully, this recipe doesn't require one - yay!

Makes enough to fill a 1 litre tub.
Ingredients:
3 eggs, separated,
75g icing sugar
300ml double cream
1/2 tsp vanilla essence
75g pecans, chopped
30g butter
100g brown sugar

Method:
Melt the butter in a pan, then add the pecans and stir.
Add the brown sugar and stir until its all melted.
Leave it to cool, preferably on a non stick tray (because it will stick to everything as it sets), then crumble it all up.

Whisk the egg whites until stiff.
Add icing sugar a bit at a time, whisking until stiff each time.
Whip the double cream until it holds it's shape, but is still a bit floppy.
Lightly beat the egg yolks with the vanilla, then add the toffee nut concoction and mix thoroughly.
Then gently fold the toffee/egg mixture and a third of the whites into the cream.
Being even gentler, fold in the rest of the whites then transfer to a plastic tub and chill overnight.

Even my pickiest child helped polish off this yummy stuff.
Uber success!
More flavours to come...
Free printable recipe card. Just right click & save as.

If you like what you see, share it using one of the magic buttons below. 
Leave a comment or even subscribe, it would make my day :)

Tuesday, October 25, 2016

Tempting Tuesday: Baby Quiche

Tempting Tuesday: trying not to kill my family with my experimental cooking.

Zander approved: 4 stars (tasty, smushable in intrigued fingers, I can do it myself but still not as good as fromage frais).

Perfect for little hands, and yummy for Mummy's in a rush.
If you want to make them for people old enough to have a little salt, they are nicer with (as most things are), but for small people under two, they can be salt free.
You'll need a muffin tray.

Ingredients:

4 slices of bread with the crusts cut off
3 eggs
3 tbsp milk
heaped tbsp frozen peas
heaped tbsp grated cheese
a few broccoli florets, finely chopped

Beat the eggs and milk in a large shallow bowl.
Because I wanted squares and my bread is rectangular, I cut them up so that 4 slices would go into 6 moulds, as you can see in the photo above. The fact that the bread isn't one whole piece for two of the muffin moulds won't make a different once it's cooked.

Dip the bread in the egg, coating both sides, then place each slice in the tray.
Don't worry about leftover egg, we'll use it in a second.


Mix your veggies up with the cheese and left over egg.
Divide it all up carefully into each portion.

Bake them in a preheated oven at 180°C for about 15 minutes, until they are cooked through.
I tend to store them in a tuppaware box in the fridge, where they get eaten in a few days.

I love that you don't have to go with peas and broccoli, you can chose anything; meat/veg or just whatever you have in the fridge, which stops small people getting bored and provides ample opportunity for trying lots of new foods.
Free printable recipe card. Just right click & save as.

If you like what you see, share it using one of the magic buttons below. 
Leave a comment or even subscribe, it would make my day :)


Tuesday, October 18, 2016

Tempting Tuesday: Caramelised Apples with Cinnamon Rice

Tempting Tuesday: trying not to kill my family with my experimental cooking.

I am 90% certain I cocked this up.
For a start, when I came to make it I found I didn't have any cinnamon so I thought I'd use nutmeg instead, which would have been fine had I not used far too much.
Then, I must've not had the stove hot enough as it took so long to reduce the rice, the orange peel had disintigrated and I had to try and fish out the little leftovers.
When I came to cook the apples I decided to use the last bramley up and I misread 1 tsp as 1 tbsp and ended up with very soggy apples. Though edible, I could tell which apple wedge belonged to the bramley and which did not, despite the overpowering nutmeg.

Ingredients:
rice:
100g arborio or pudding rice
850ml milk
75g sugar
1 tsp vanilla ess
1/2 tsp cinnamon
1 strip of orange peel
apples;
25g butter
2 eating apples, peeled, cored and chopped into wedges
1 heaped tsp brown sugar

Put rice, milk, sugar, vanilla, cinnamon and orange peel in a pan and bring to the boil.
Lower the heat and simmer for twenty to thirty minutes until soft and thick. Keep stirring regularly so the rice doesn't stick to the bottom, especially as it gets really thick.


Remove the orange peel and set aside for fifteen minutes.

Melt butter in a frying pan and add the apple wedges.
Sprinkle over the brown sugar and cook on a low heat until the apples are soft and delightfully caramelised.
Serve over the rice.

This is delicious both hot and cold, but personally I prefer it on the warmer side.
Let me know what you think.
Free printable recipe card. Just right click & save as.

If you like what you see, share it using one of the magic buttons below. 
Leave a comment or even subscribe, it would make my day :)

Tuesday, October 11, 2016

Tempting Tuesday: Baby Banana Fingers

Tempting Tuesday: trying not to kill my family with my experimental cooking.


I made these for Bean and Ed when they were tiny, so obviously Zander gets them too. They're so easy to make and they're brilliant for babies who are just getting the hang of this whole eating thing. They're also junk free, with no sugar unless you decide you want them sweeter.

Ingredients:
2x bananas, preferably ripe.
a mug full of self raising flour,
a mug full of instant oats (or smashed up* porridge oats)
100g butter or 3tbsp oil
1 tsp vanilla essence. 
Please excuse my three bananas, as I got so many of them in my 9 pence bag, I thought I'd make a giant batch and see if half of them survive going in the freezer.

Smush up all the ingredients together.

Make them into baby fist size fingers (yes, I know they look like poos), and bake in the oven for about 15 minutes (or until golden) at 180°C (fan oven)


*smash up porridge oats using a food processer

***************UPDATE***************
It took a few attempts, but Zander really seems to like them (although he's in his throwing stuff stage).
And the best news ever...they survive the freezer!! Once defrosted at room temperature, you'd never guess they'd been frozen. Yay!
Time to make a giant batch.
Free printable recipe card. Just right click & save as.

If you like what you see, share it using one of the magic buttons below. 
Leave a comment or even subscribe, it would make my day :)

Tuesday, August 30, 2016

Tempting Tuesday: Carrot Drop Scones

Tempting Tuesday: trying not to kill my family with my experimental cooking.


Ingredients:
100g self raising flour
1/4 tsp mixed spice
1x egg
80g grated carrot
4 tbsp plain yogurt
100ml milk
Add all the ingredients together and mix well. 
Fry dollops of the stuff in the pan, make them as big or small as you like (a ladle gives a good amount). Fry on both sides.
You could exchange some of the carrot for grated courgette, that would be yummy too.
Free printable recipe card. Just right click & save as.

If you like what you see, share it using one of the magic buttons below. 
Leave a comment or even subscribe, it would make my day :)